Tricky Doors Walkthrough: Level 1
If you aren’t thinking outside the box, Tricky Doors can and will trip you up. Solutions aren’t immediately apparent, and often bizarre. It’s okay to ask for help if you’re stuck, so use ourcomplete walkthrough for level 1 of Tricky Doors.
Complete Tricky Doors Magic World Walkthrough: Level 1
Part 1: Should’ve Brought a Keyring
First up on your agenda inTricky Doorsis to collect a series of keys. There are four in total, the same number of keys needed to unlock the trapdoor.
With all four keys at your disposal, examine the trapdoor, insert each one into the four locks, and move on through.

Part 2: What Is This, Minecraft?
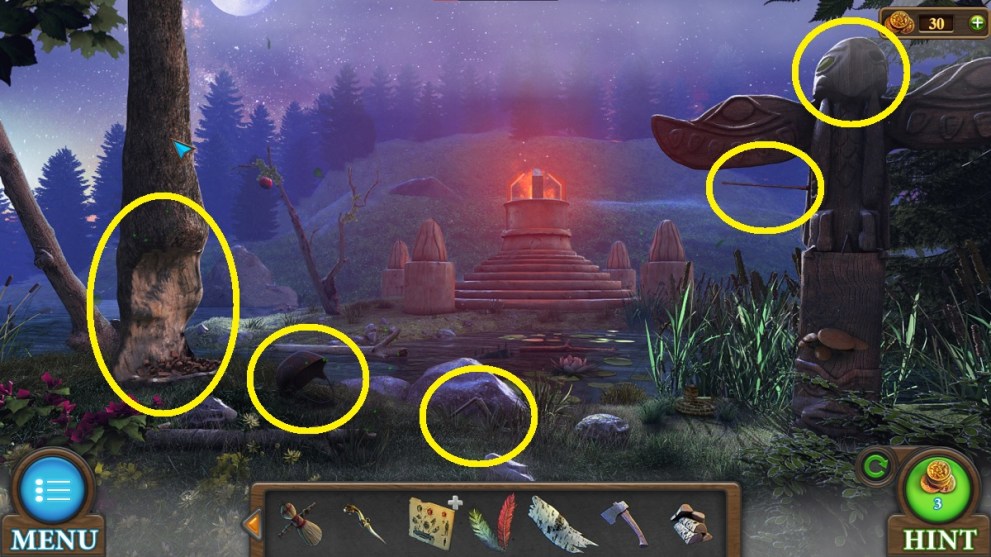
Take in the scenery. You can see on the left, in the distance, the cabin you just left. To the right, there’s a path that takes you to a bonfire. Immediately to your left and right are a caged bird and a well, respectively. Lastly, there are four owls in the top-right corner and a tree stump in front of you.
With that said and done, you can move on to the next part. Travel to the bonfire in the distance.

Part 3: Crossing the River
To get closer to the bonfire, you need to create a bridge. This is a lot easier than you think, thanks to nature.
You’ve done all you may for now. Let’s move on to the bonfire. To cross the bridge, simply click on it and you’ll get a better view of the bonfire.

Part 4: Fire is Hot
you’re able to ignore the structures around the bonfire for now. Instead, click on the bonfire to get a closer look.
Short and sweet, right? We aren’t done just yet. We need to double back once again to the cabin you started in.
Part 5: Crafting a Bow
This is really starting to feel likeMinecraftbecause now we need to craft a bow. Back at the cabin, we’re going to focus on the chest.
In the chest, you’ll find a nest and another stick. Starting with the stick, combine the rope, arrow, and feathers to craft a bow and arrow.

Part 6: How Good is Your Aim?
Leave the cabin and head back to the bonfire, but don’t cross your makeshift bridge. Stop short of crossing. If you look just above the bridge, you’ll see a tree with an apple at the top.
The glass bottle isn’t without its uses, but not here. Let’s mosey on back to the cabin!
Part 7: Sugar, Spice, and Everything Nice
In the cabin, revisit the table at the back. You’ll find a little wooden stand where you can place your newly found glass bottle. Do that, then find the potion recipe in your inventory:
With your magic apple, we’re going to take a trip to another land. Prepare yourself, because it’s going to get a little trippy in level 1 of Tricky Doors.
Part 8: Honey, I Shrunk Myself
Before you leave, examine the window in the cabin. Take that blue gem you got from the totem and insert it into the empty socket, right in the middle of the flower. A beam of light will shine onto the glass bottle on the table.
Your inventory is looking pretty empty now. You should be left with the nymph and knife at this point. Hang in there—we’re almost finished with our Tricky Doors level 1 walkthrough!
Before you step away from the webs, examine the boulder in the background. Click on the darker section, entangled in vines, to reveal a bug puzzle. The top section, where it’s blue, should match the line of bugs in the top-left; the bottom section, where it’s red, should match the line of bugs in the top-right.
It’s easier to finish the top first, and then work on the bottom. If you’re having trouble, you can use the skip button in the bottom-right. Unfortunately, the puzzle is slightly different for everyone. Upon completion, a hidden compartment in the rock will open. Read the note and take the Golden Spatula.
Part 9: The Bonfire Puzzle Solution
The praying mantis looks hungry, but he doesn’t seem all that interested in you. What you’re able to do is give him the nymph in your inventory for a magic stamp.
With the blind bird’s feather in your inventory, you’re on the final stretch of our Tricky Doors walkthrough.
Part 10: Gathering Ingredients
Back at the cabin, it’s now time to use the scales we’ve ignored for so long. They’re on the left, placed on the cabinet. Examine the cabinet door above the scale. The key that you’ve been keeping warm will unlock the door. Grab the three jars inside.
When you’re at the scales, select each bottle so that they’re placed on the shelves on the left and right sides. These will act as your ingredients showcased in the magic ink recipe.
Part 11: Escaping the Escape Room
To escape, you need to craft a bottle of magic ink, but it requires a very specific amount of each ingredient you have.
Now, back away from the scales and revisit the table one last time. Place the magic ink on the table, then dip the feather into the ink. Click on the glowing book and away you go!
And now we can close the book on ourlevel 1 Tricky Doors walkthrough. The Magic World was truly whimsical in its own weird way, but that isn’t the last escape room you’ll see. If you enjoy sci-fi,Traceis a lovely combination of space and escape rooms. For a trippy experience, trySuperliminal!
